Saturday, 25 September 2010

Papertrey September Blog Hop Challenge

This is the first time I have participated in PTI's blog hop challenge.  The task set by Nichole was:

"One of the most fun things about this hobby is the people you meet, whether in person or online, and the things you learn from them.  Now is your chance to show off any skills you might have learned from a fellow stamper, and perhaps even give them a little shout out to thank them for the inspiration they have provided.  Create a project using one of your favorite learned skills and perhaps after a little blog hopping, we will ALL learn some new tips and tricks and continue to pass on the love of this hobby!"

Well I found this quite hard!  The reason I say it was hard is that there are loads of people I can think of that I have learned from - so to pick one is really difficult and unfair on all the others!  It also made me think about how I found out about PTI.  This finished card was totally not what I planned to make at the start of the process, but as so often happens it evolved as I was making it.  It does, however, reflect various elements/tips/techniques that I have picked up along the way!

Recipe
Stamps: PTI Background Basics: Retro, Hero Arts Bird Branch Alphabet
Cardstock/Paper: PTI Smokey Shadow, SU Whisper White
Ink: Versafine Black, Versamark
Tools/Accessories: PTI Harvest Gold satin ribbon, White filigree embossing powder, Clear embossing powder, Tattered Angels Glimmer Chips Frosty Memories, Self-adhesive gems from stash, black 3D foam pads (shock horror not SU Stampin Dimensionals - only cos they don't do them in black!)

As this is a square card I thought I would also enter it into A Passion for Papertrey's challenge: Hip to be Square. Additionally, it also meets the requirements of Embellish Magazine's latest colour and stamped background challenge. So this is a first for me - a card that fits 3 challenges!

And who are all those people that have inspired this card? 
  • Dawn Bibby, QVC UK: It's her fault (LOL!) that I got into paper crafting at all!
  • Susie Candlin's workshops at Coleman's Craft Warehouse: Don't use black embossing powder but stamp in black ink & use clear embossing powder (you avoid getting nasty unwanted black specks on your card)
  • Michelle Last: Getting a blog; Taking part in challenges
  • Kristina Werner: Colour Combos & Challenges; How to secure ribbon to a card by making a slit on the spine of the card; How to get good clear images from clear acrylic stamps by using Versamark before adding the ink you wish to stamp with
  • Dawn McVey: Colour Combos; How to tie bows/knots in ribbon; How to create stamped backgrounds with PTI stamps
  • Nichole Heady: PTI products & design elements in general
Merci beaucoup to you all!

A la prochaine!  Amitiés.

Nicole

Thursday, 23 September 2010

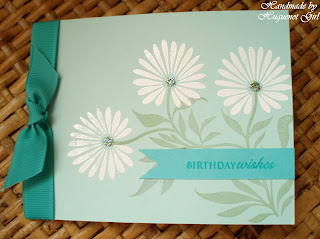
Which Version Do You Prefer?

Hi there!  Thought I would get interactive today and wondered if you could let me know which of these three versions of a similar card do you prefer?

I started off with this one (let's call this version 1 - original huh?!):


I really loved the simplicity of this but wondered whether it would be better to add a sentiment, so added this SU modern label and ended up with this revised card (let's call this version 2):


However, wasn't sure I really liked it - think I preferred the original version, but I really wanted to have a sentiment.  So decided to come up with a variation and this is what I ended up with (version 3):


Recipes
Stamps: PTI CHA Set 2010 Four of a Kind, PTI Anniversary Set Round and Round
Cardstock/Paper: PTI Aqua Mist, PTI Hawaiian Shores
Ink: PTI Simply Chartreuse, Versamark
Tools/Accessories: PTI Hawaiian Shores grosgrain ribbon, Stickles patina, SU modern label punch, SU stampin dimensionals, White filigree embossing powder, clear embossing powder

So how did I do the last card?  Well I stamped the large leaf image from the stamp set using PTI Simply Chartreuse ink onto PTI Aqua Mist cardstock.  Then using the single matching leaf image I stamped this (again using the same ink) where the fourth flower should have been.  Next I stamped the 3 flower images with Versamark and then heat embossed them with white Filigree embossing powder, adding Patina Stickles to accent the flower centres.  Using a scrap of PTI Hawaiian Shores cardstock I made a strip of card to cover the join of the stamped leaf images.  Onto this strip I then stamped my greeting in Versamark and heat embossed it with clear embossing powder.  Finally I added the knotted ribbon round the card.  Et voilà!

By the way I know the colours look slightly different on the last version, but they are the same (despite my best efforts to adjust in Picassa) - just shows what a difference it makes when a photo is taken on a different day (despite being taken in the same place about the same time of day and with (seemingly) similar light conditions!).

No doubt those of you who are PTI aficionados will have spotted that I used PTI’s exclusive CHA Four of a Kind stamp set (only available to those who attended CHA in Chicago this July). Unfortunately I was not one of those lucky people (sigh) – but I did manage to acquire this set from someone who had been and had got at least 2 (and probably more!) and was kind enough to share one of her extra sets!

So which version do you prefer?  Let me know in the comments section!  I thought I liked the last version best but now I'm not so sure (whoever came up with the phrase "I used to be indecisive but now I'm not so sure" must have been thinking of me!).

A la prochaine! Amitiés.

Nicole

Monday, 20 September 2010

Anniversary Cards

Over the summer I have had quite a few commissions to make anniversary cards - particularly for 70th (platinum) anniversary as the shops don't seem to stock cards for this particular anniversary.  By the way they were not all for the same couple!  Apologies in advance for the quality of some of the photos but some were taken with my mobile phone as I didn't have my camera to hand.  I think the first card is my favourite (it was actually the last one I did, so probably an amalgation of all the others!).


Hopefully in this close up you can see the colours better and how I've used a Quickutz retro diamonds patterned embossing folder on the card background.

This is another card for the same couple:


This is another 70th anniversary card, but this time for a different couple.  I like the simplicity of the design, but was told it was a bit too subtle for the previous couple (whose eye sight are bad), so didn't replicate it:

And finally a 60th anniversary card:

Recipe
Stamps: PTI Anniversary Set Round & Round, PTI All Booked Up, Hero Arts Dots & Flowers
Cardstock/Paper: PTI Stamper's Select White, PTI Enchanted Evening
Ink: Encore Silver, Encore Blue, PTI Enchanted Evening
Tools/Accessories: SU Whisper White satin ribbon, Blue organza ribbon from stash, PTI Mat Stack, Cuttlebug, Quickutz Retro Diamonds Embossing Folder, We R Memory Keepers Corner Chomper, Light blue adhesive gems from stash, Express Yourself DIY number toppers with stars

A la prochaine! Amitiés

Nicole

Thursday, 9 September 2010

Quick card

I suddenly remembered this morning that I needed to send a birthday card today to one of my colleagues.  I didn't have much time as I needed to get to work but I managed to pull this card together card in just 10 minutes (this includes design time) which must be some sort of miracle for me (LOL!) - although it was made up mostly from leftover elements from other projects!


Recipe
Stamps: PTI Anniversary Set Round and Round
Cardstock/Paper: White A6 card blank from stash, PTI Stamper's Select White, PTI Green Boutique
Ink: PTI Hawaiian Shores, PTI Aqua Mist, PTI New Leaf
Tools/Accessories: Self-adhesive gems from stash, SU circle & modern label punches, PTI Mat Stack 3 die, PTI Hawaiian Shores classic grosgrain ribbon, SU Stampin Dimensionals

I started off with a die cut I had made using PTI's mat stack 3 die with one of PTI's Green Boutique paper (by the way I absolutely love this die - I bought the All Booked Up stamp set almost just because of the co-ordinating stamp!).  I had planned to use the die cut with another card but it didn't work (will show what did work in a couple of days!).  I then wanted to use an image I had stamped using PTI's latest anniversary set Round and Round (am just loving this stamp set it is SOOOOO versatile!).  The stamping had gone slightly wrong on the leaves, so I had restamped the leaves part of the image and then cut them out and mounted them with 3D foam to cover up the original mistake and give it more dimension.  Even the ribbon had been left over from another card and you know how us crafters never like to waste anything!  The only "new" bit was the "Birthday Wishes" sentiment punched out using SU's modern label punch which I acquired via a friend of a friend as this punch is not (currently) available in the UK SU catalogue.  And just time for a quick photo (apologies as it is not the best) before I was out the door to work.  Et voilà!

It made me realise that it is very useful to have some elements ready on stand-by to help out when I need to put together a quick card.

As I have used some punches and a die, I thought it qualified for the latest challenge on A Passion for Papertrey - punch it!

Whilst I am not claiming this is the best card I have ever made, I am nevertheless happy with the outcome!  Not bad for 10 minutes!  What do you think?

A la prochaine!  Amitiés!

Nicole

LinkWithin

Related Posts with Thumbnails