Showing posts with label Blog Hop. Show all posts

Thursday, 8 September 2016

Pinkies Autumn/Winter Blog Hop


Thank you for joining us on another Pinkies Blog Hop! We're showcasing lots of gorgeous projects using products from the new Stampin' Up!® Seasonal Autumn Winter Catalogue. Simply use the buttons at the end of each post to keep hopping!

Welcome to those who have joined me from Sarah's blog - wasn't her project gorgeous? I just love how she has used the new products from Stampin' Up!'s new seasonal catalogue which runs until the end of the year.

One of the first products I feel immediately in love with was the gorgeous and versatile Candy Cane Lane Designer Series Paper. I particularly love the sheet with the gingerbread houses and could not resist using this as the basis for my project – a 3D shadow box card.


After cutting out the gingerbread house image, I have used crumb cake cardstock as the background to the shadow box – having first embossed it with the Falling Softly embossing folder and using the chalk marker on the embossed image, so it looks like snow falling. I finished off the edges of the card using images cut from other sheets of the DSP.


Of course as it was a 3D card, I needed to make an envelope to fit, so used some more of the Candy Cane Lane DSP and the envelope punch board to make the perfect envelope


If you want to know how to make a shadow box card, you will find lots of tutorials on YouTube.

Don't forget to stop by Catherine's blog as I know she has a fab project to share with you. Click on the next button below to take a look


To make these projects you will need:

Cardstock/Paper: Thick Whisper White, Crumb Cake, Candy Cane Lane DSP ♦ Stamps: Star of Light ♦ Ink: Real Red ♦ Tools/Accessories: Simply Scored Scoring Tool, Envelope Punch Board, Falling Softly Textured Impressions Embossing Folder, Wink of Stella pen (clear), Linen Thread, Stampin' Dimensionals, Glue Dots, Chalk marker


You can order from my online shop 24/7 or if you prefer contact me directly. Why not contact me and I’ll send you a free copy of the seasonal catalogue.

A la prochaine! Amitiés!

Nicole

Thursday, 26 May 2016

Pinkies Sneak Peak 2016/17 Annual Catalogue Blog Hop


Thank you for joining us on another Pinkies Blog Hop! We're showcasing lots of gorgeous projects using products from the new Stampin' Up!® Annual Catalogue. Simply use the buttons at the end of each post to keep hopping!

Welcome to those who have joined me from Hannah's blog - wasn't her project gorgeous? I just love how she has used the new products from Stampin' Up!'s new annual catalogue which launches on 1 June.

I have a lot of birthdays coming up so needed to make a batch of girlie cards and just had to use one of the new in-colours - Sweet Sugarplum [don't you just love the colour and the name ;-)]. I decided to pair it with one of the new hostess sets - Gift of Love. I also used the new Thoughtful Banners stamp set which co-ordinates with a new punch - the Duet Banner Punch (and you'll be able to get both as a bundle and save 10% - I love a bargain!)


The panel on the side has been made by stamping one of the images from Gorgeous Grunge in Sweet Sugarplum ink onto Sweet Sugarplum cardstock, interspersed with light brushes from the Wink of Stella gold pen. I also created a raised effect by stamping the banner twice, and cutting part of it out and gave it extra dimension by using Stampin' Dimensionals.


I did lots of versions of the flowers, until I was happy with the blended effect, but like all crafters I don't like to waste anything, so used some left over items to make these two cards....


Don't forget to stop by Sarah's blog as I know she has a fab project to share with you. Click on the next button below to take a look....


To make these projects you will need:

Cardstock/Paper: Thick Whisper White, Whisper White, Sweet Sugarplum ♦ Stamps: Gift of Love (Hostess 2016/17), Thoughtful Banners, Gorgeous Grunge ♦ Ink: Sweet Sugarplum, Pear Pizzazz, Momento Black Tuxedo, Blushing Bride, ♦ Tools/Accessories: Duet Banner Punch, Wink of Stella pen (gold)  Stampin' Dimensionals, Blender pen


You can order from my online shop 24/7 or if you prefer contact me directly. Don't forget you can't order any of the sneak peak items though until 1 June 2016. Why not contact me and I’ll send you an advance copy of the new catalogue.

A la prochaine! Amitiés!

Nicole

Thursday, 28 January 2016

Pinkies Stampin' Up! Sale-a-Bration Blog Hop 2016

Thank you for joining us on another Pinkies Blog Hop! We're showcasing lots of gorgeous projects using new Stampin' Up!® products that you can earn free during Sale-a-Bration. Simply use the buttons at the end of each post to keep hopping!

Welcome to those who have joined me from Tracy's blog - wasn't her project gorgeous? I just love how she has used the free (yes free!) products from the Stampin' Up!'s annual Sale-a-Bration (SAB) catalogue!

I needed to make a masculine thank you card and as I was browsing through the Botanical Gardens Designer Vellum stack, one design stood out for me, and then I thought how fab it would look if I coloured it in different shades of green.


I decided not to colour in every leaf as I wanted some contrast and to maintain the translucence of the vellum. I used basic black cardstock behind the vellum to make it stand out and matted and layered with some whisper white to make it pop. Whilst it was a bit fiddly colouring in the leaves, it is a bit like the latest craze for adult colouring books, so actually was quite relaxing and theraputic.

So how do you get your hands on this lush vellum?! Well for every £45 (before P&P) that you spend on catalogue items (annual and Spring/Summer) you can choose a free item from the 2016 Sale-a-Bration catalogue and this includes the Botanical Gardens Designer Vellum Stack (24 sheets: 3 each of 8 designs). And the best thing is there is no limit - so if you spend £90 you can choose 2 free items and so on. This is a limited time offer and only runs until 31 March 2016. There are 11 items this year - however 3 of these are time-limited and are only available until 15 February! Why not look at the SAB catalogue on my side-bar to see all the items available.

Don't forget to stop by Sue's blog as I know she has a fab project to share with you. Click on the next button below to take a look....


To make this project you will need:

Cardstock/Paper: Basic Black, Mossy Meadow, Whisper White, Botanical Gardens Designer Vellum Stack (SAB 2016 freebie) ♦ Stamps: Endless Thanks ♦ Ink: Mossy Meadow, Always Artichoke, Old Olive, Pear Pizzazz, Memento Tuxedo Black ♦ Tools/Accessories: Stampin’ Dimensionals


A la prochaine! Amitiés!

Nicole

Thursday, 7 January 2016

Pinkies Stampin' Up! Blog Hop - Spring/Summer Seasonal Catalogue 2016

Thank you for joining us on another Pinkies Blog Hop! We're showcasing lots of gorgeous projects using products from the new Stampin' Up!® Spring/Summer Catalogue. Simply use the buttons at the end of each post to keep hopping!

Welcome to those who have joined me from Lizy's blog - wasn't her project gorgeous? I just love how she has used the products from the new 2016 Spring/Summer catalogue!

Research has shown that the most common type of card sent is a birthday card and as I have several cards to make for friends in January, I thought I would share one of the cards I have made using some of the latest SU products.

Firstly I have used some of the lovely Love Blossoms designer series paper – this is really versatile 6" x 6" (15.2 cm x 15.2 cm) stack as it has 48 sheets - 4 each of 12 double-sided designs and although one side is “valentine” themed, the hearts are quite small and the other side is mostly floral patterns so can be used for lots of different occasions.


To get the background I stamped the large image from You've Got This from the annual catalogue - I stamped it in Tip Top Taupe, but stamped off first to get a lighter effect.  I then used the lovely small flower image from the new set Birthday Blooms and used Garden Green ink. I used some silver Dazzling Details to accent the stamens of the flower.


I just love how the colours coordinate - and even though I have used valentine paper I hope this shows that you can use it for so much more than Valentine's day!


Don't forget to stop by Heidi's blog as I know she has a fab project to share with you. Click on the next button below to take a look....


To make this project you will need:

Cardstock/Paper: Tip Top Taupe, Blushing Bride, Love Blossoms DSP Stack ♦ Stamps: Birthday Blooms, You've Got This, Wetlands ♦ Ink: Tip Top Taupe, Garden Green, Tuxedo Black Memento ♦ Tools/Accessories: Basic Rhinestones, Stampin’ Dimensionals,  Banner Triple Punch, Bitty Butterfly Punch, Silver Dazzling Details


A la prochaine! Amitiés!

Nicole

Saturday, 20 June 2015

2015/16 Annual Catalogue Blog Hop Featuring Birthday Blossoms

Thank you for joining us on another Pinkies Blog Hop! We're showcasing lots of gorgeous projects using products from the new Stampin' Up!® Annual Catalogue. Simply use the buttons at the end of each post to keep hopping!

Welcome to those who have joined me from Sue's blog - wasn't her project gorgeous? I just love how she has used the products from the new catalogue!

Two of my must haves when I saw the new catalogue were the Brick Wall embossing folder and the Birthday Blossoms stamp set and straight away I had an idea for a card using both of these gorgeous products and here it is!


Little tip - I stamped and coloured (using the blender pen) the background flowers before I embossed (in actual fact I debossed as that gets the proper effect of a wall).


Other new products used include the Banner Triple Punch which makes cutting banners a breeze. I have also used the new Whisper White Thick Cardstock (270gsm) which is great for card bases.


Have a great weekend but don't forget to stop by Michelle's blog as I know she has a fab project to share with you. Click on the next button below to take a look....


To make this project you will need:

Cardstock/Paper: Whisper White, Whisper White A4 Thick Cardstock, Elegant Eggplant ♦ Stamps: Birthday Blossoms ♦ Ink: Black Stazon, Elegant Eggplant, Wisteria Wonder ♦ Tools/Accessories: Big Shot, Brick Wall Embossing Folder, Heat Tool, White Embossing Powder, Basic Pearls, Stampin’ Dimensionals,  Banner Triple Punch


A la prochaine! Amitiés!

Nicole

Saturday, 6 September 2014

Pinkies Stampin' Up! Blog Hop - Autumn/Winter Seasonal Catalogue 2014

Thank you for joining us on another Pinkies Blog Hop! We're showcasing lots of gorgeous projects using products from the new Stampin' Up!® Autumn/Winter Seasonal Catalogue. Simply use the buttons at the end of each post to keep hopping!

Welcome to those who have joined me from Kim P's blog - wasn't her project gorgeous? I just love how she has used the products from the new catalogue!


My project is my first Christmas card of 2014 - which feels a bit surreal as when I was making this card earlier this week it was a hot and sunny day. One of the first sets I was drawn to in the new seasonal catalogue was the Wondrous Wreath photopolymer set with the matching framelits (as a result there's a bundle with 15% off - don't you just love a bargain?!). I wanted to make my wreath very Christmassy (but modern) so decided my main colours would be just silver and gold.

As Wondrous Wreath is a photopolymer set it makes two-step stamping a breeze by perfectly lining up the coordinating images. I started off my wreath by stamping the main image in Smoky Slate ink. The next layer (which is just a few of the leaves highlighted from the first image) was stamped in versamark and then heat embossed in silver. The final layer is the berries and once again these were stamped in versamark, but this time I heat embossed in gold. The wreath then was cut out with the matching framelits. It could have been really tricky lining this up, but was made super easy with the guides on both the stamps and the framelits. You can see the guides on the framelits in the image below.


I used the "Noel" word die from the framelit set for my greeting, but I wanted to add more depth to this (to match the wreath), so I did several die cuts and layered one on top of the other (the bottom 4 were in Whisper White and the top in gold foil). Btw (by the way) there is also another word die in the framelits set - "Joy" - but of course being a Francophile I just had to go with "Noël" (mais oui bien sûr)!


So what are you waiting for? Do you want to get your hands on some fabulous new product? Well you can order from my online shop 24/7 or if you prefer contact me directly. And if you are local to me why not hold a party and get your friends to come along for some crafting fun!

Have a great weekend but don't forget to stop by Kim H's blog as I know she has a fab project to share with you. Click on the next button below to take a look....


To make this project you will need:

Cardstock/Paper: Whisper White, Naturals Ivory, Gold Foil, Brushed Silver ♦ Stamps: Wondrous Wreath ♦ Ink: Smoky Slate, Versamark ♦ Tools/Accessories: Heat Gun, Silver Embossing Powder, Gold Embossing Powder, Big Shot, Wondrous Wreath Framelits Dies, Rhinestones, Stampin’ Dimensionals, Envelope Punch Board


Have a fantastic weekend!  A la prochaine! Amitiés!

Nicole

Saturday, 19 July 2014

Pinkies Stampin' Up! Blog Hop - 2014 Annual Catalogue

Thank you for joining us on another Pinkies Blog Hop! We're showcasing lots of gorgeous projects using products from the new Stampin' Up!® Annual Catalogue. Simply use the buttons at the end of each post to keep hopping!

Welcome to those who have joined me from Anne-Marie's blog - wasn't her project gorgeous? I just love how she has used the products from the new catalogue!


I have made this cute card which focuses on 4 brand new products from the new annual catalogue. The first thing you will notice is the card base which is a luscious new in-colour - Blackberry Bliss.  You will then notice the leafy image which is one of 6 images in the Bloom with Hope stamp set (there are also 4 sentiments - one of which I used on the card as well). This new exclusive hostess set is very suited to another new product - Blendabilities.

What are Blendabilities? They are Stampin' Up!'s new alcohol based markers. You will need to use a water based ink to stamp your image to prevent any bleed when colouring in - so Stampin' Up! now stock Momento Tuxedo Black ink which is the ink of choice for crafters to use when colouring with alcohol based markers.


One of the other great things about Blendabilities is that they can also be used to colour in your rhinestones and pearls – which is just perfect for a matchy matchy girl like me!


The final new product I have used is one of the punches from the new Itty Bitty Accents punch pack. I was disappointed when I heard that the Itty Bitty Shapes punch pack was retiring from the last annual catalogue, but as soon as I saw this new trio of punches I forgot all about missing the old ones! This new set includes a heart, star and an adorable shaped mini flower which I have used here. Don't you just love how the pale cool colour of Pool Party is a great contrast with the vibrant Blackberry Bliss?

To make this project you will need:

Cardstock/Paper: Blackberry Bliss, Whisper White, Pool Party ♦ Stamps: Bloom in Hope (Hostess 2014/15) ♦ Ink: Momento Tuxedo Black, Versamark, Old Olive Blendabilities, Rich Razzleberry (dark) Blendability (for colouring rhinestone) ♦ Tools/Accessories: Itty Bitty Accents Punch Pack, Pool Party Embossing Powder, Heat Gun, Rhinestones, Stampin’ Dimensionals, Paper Piercing Tool, Essentials Paper Piercing Kit, Simply Scored Stylus (for dimension to flowers)


So what are you waiting for? Do you want to get your hands on some fabulous new product? Well you can order from my online shop 24/7 or if you prefer contact me directly. And if you are local to me why not hold a party and get your friends to come along for some crafting fun!

Have a great weekend enjoying the weather, but don't forget to stop by Christa's blog as I know she has a fab project to share with you. Click on the next button below to take a look....


Have a fantastic weekend!  A la prochaine! Amitiés!

Nicole

Saturday, 8 February 2014

Pinkies Stampin' Up! Spring Summer 2014 Blog Hop

Thank you for joining us on another Pinkies Blog Hop! We're showcasing lots of gorgeous projects using products from the new Stampin' Up!® Spring/Summer Catalogue. Simply use the buttons at the end of each post to keep hopping!

Welcome to those who have joined me from Clare's blog - wasn't her sweetie cone gorgeous? I just love how she has used the gold vellum and the sequin trim!

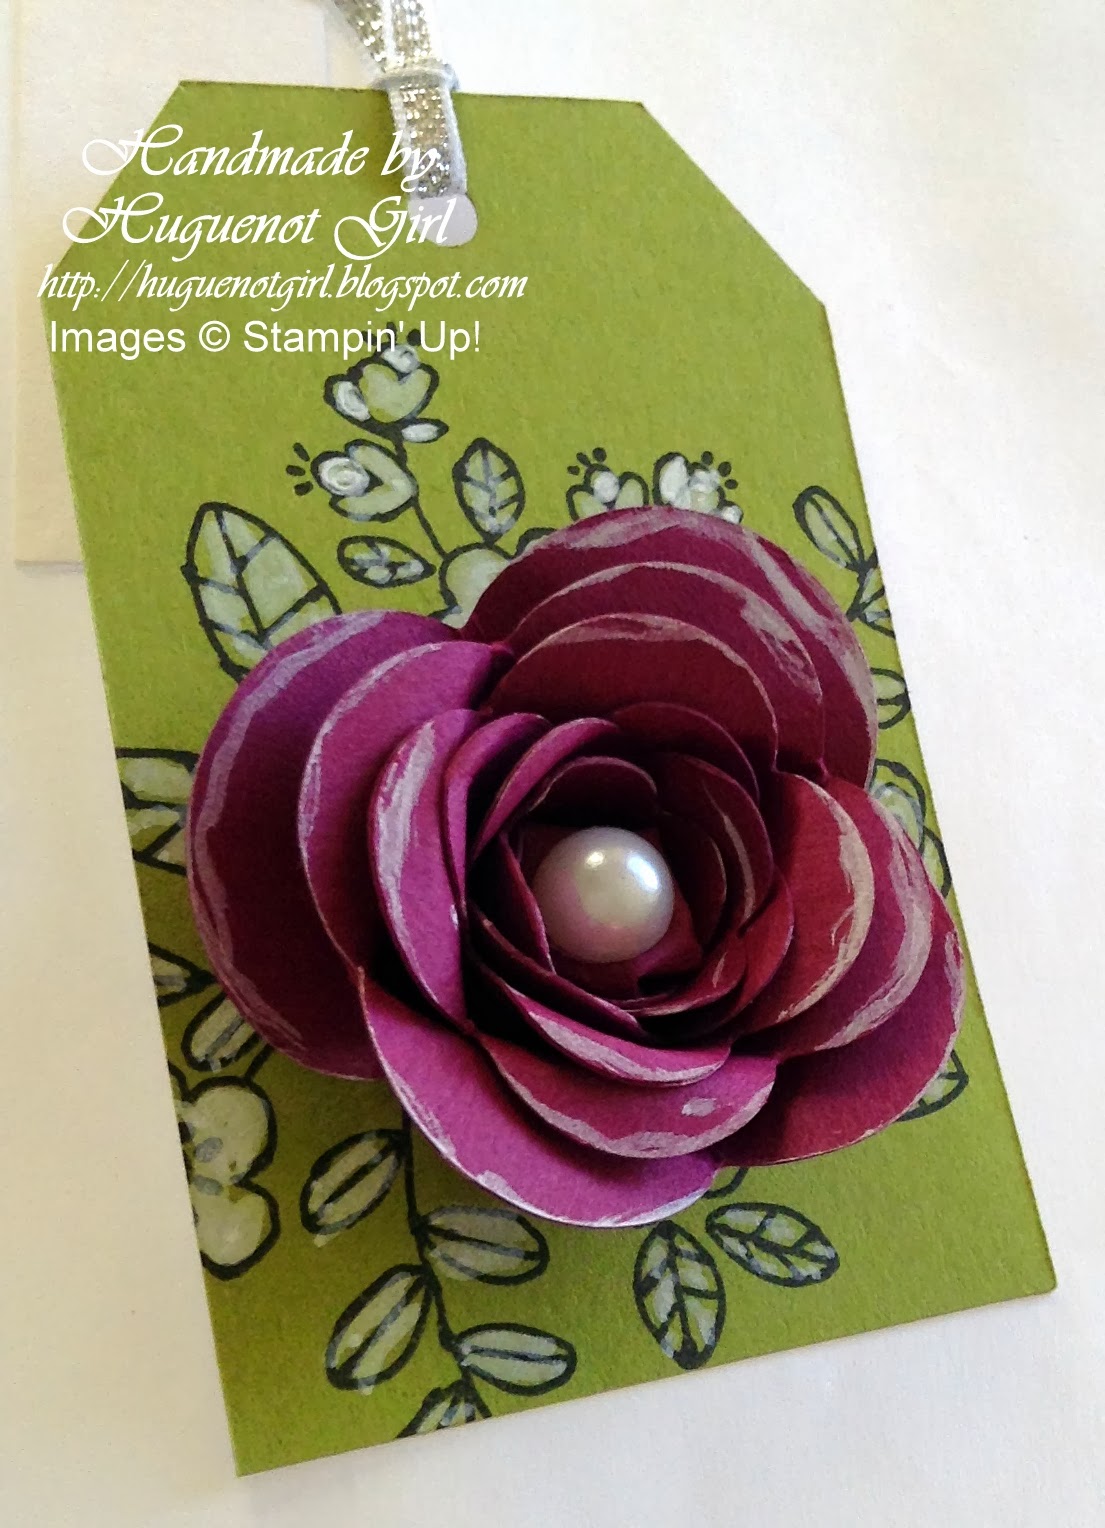
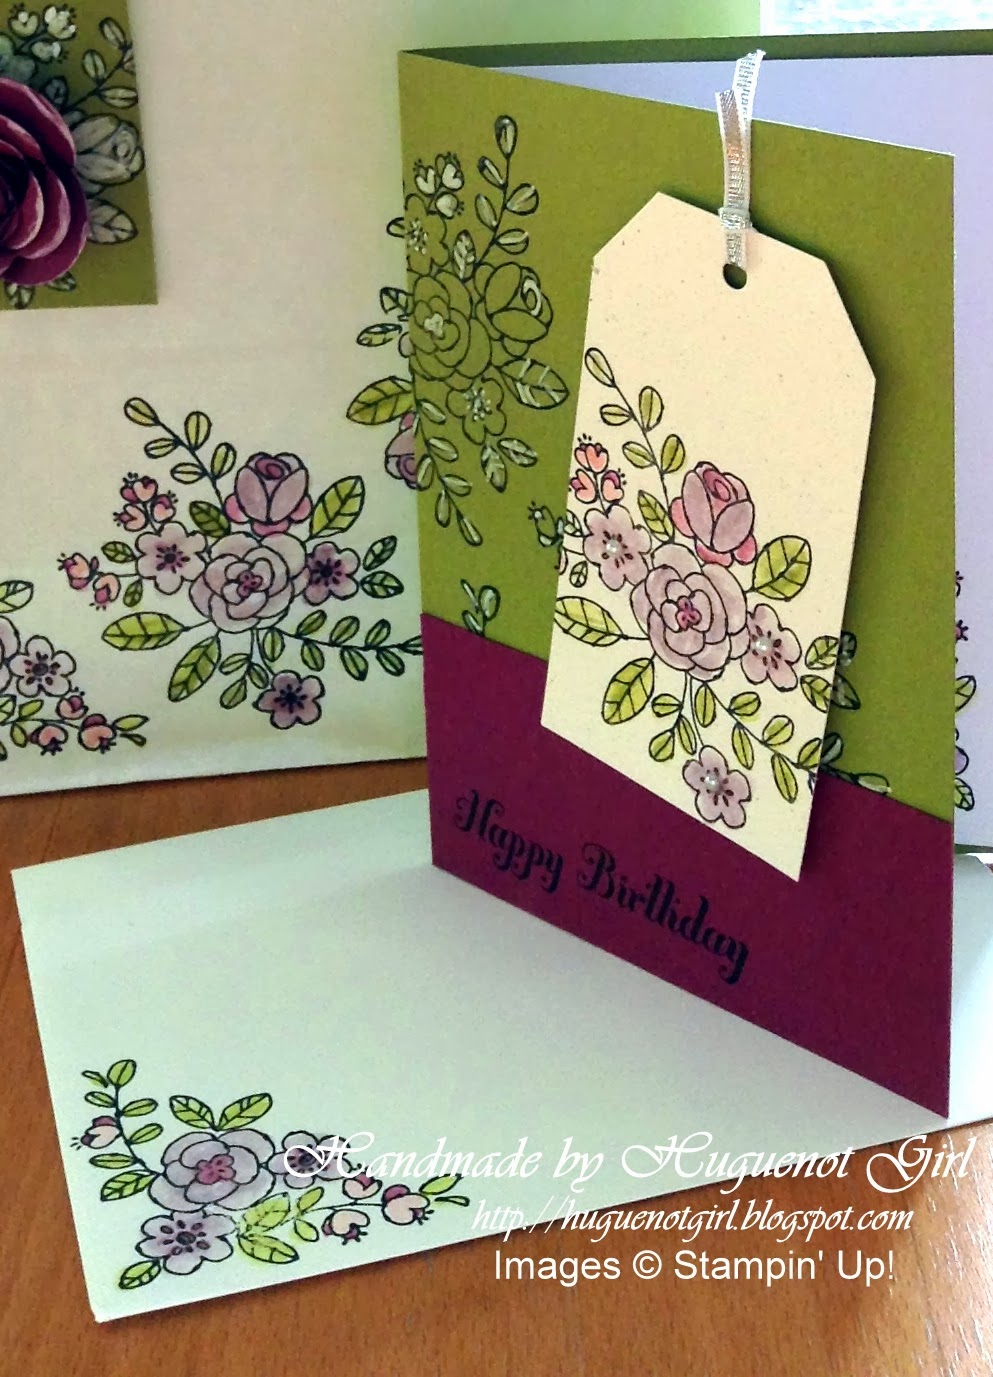
I have focused on two new products from the new seasonal catalogue – the So Very Grateful stamp set, and the Angled Tag Topper punch. I have used these to turn a plain white bag (see yesterday's post) into a (hopefully) pretty gift bag. I stamped the images from the new So Very Grateful stamp set in black stazon and then coloured in using a blender pen, which gives a more muted effect. The tag topper punch is fab – you can create a tag or topper any length you want and it even creates the hole for you!


I also used the new spiral flower die to quickly accent the tag with a stunning 3D flower (I used Crystal Effects to hold it all together).  

Of course you can’t give a present without a card, so I made a card (and envelope) to match and incorporated a tag (using the Angled Tag Topper punch once again)!


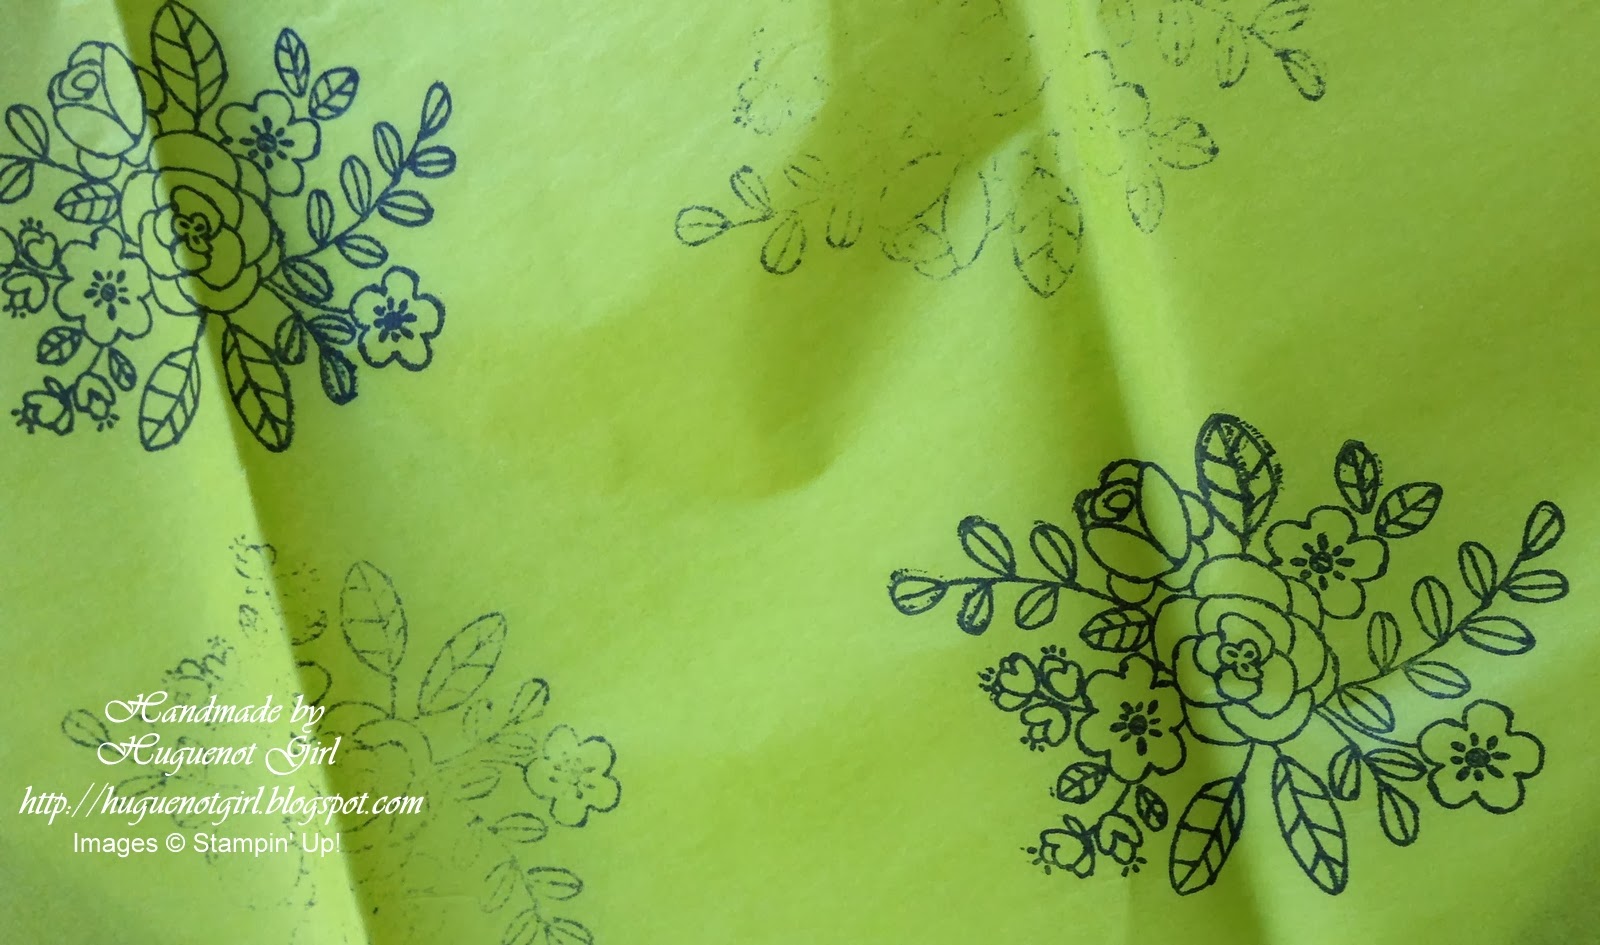
As you can probably tell I am very matchy, matchy – I even went so far as to wrap the present in the gift bag in co-ordinating tissue paper onto which I have stamped the flower images from the So Very Grateful set in black stazon. You might notice that it looks like I stamped the images a 2nd time to get a fainter image in the background. Actually no – this was not planned (the tissue paper was folded in half when I stamped the first half and because the paper is so thin the original image bled through – oops!). But as all good crafters know – there is no such thing as a mistake!


To make this project you will need:

Cardstock/Paper: Naturals White, Old Olive, Rich Razzleberry ♦ Stamps: So Very Grateful, Bring on the Cake (greeting), Tag It (for reverse of tag - not shown) ♦ Ink: Black Stazon, Old Olive, Pear Pizzazz, Rich Razzleberry, Perfect Plum, Pink Pirouette ♦ Tools/Accessories: Blender pen, Chevron embossing folder, basic pearls, Stampin' Dimensionals, White Stampin’ chalk marker, Angled Tag Topper punch, Spiral Flower Originals die, Silver ribbon, Crystal Effects, plain white paper gift bag, tissue paper


You can order from my online shop 24/7 or if you prefer contact me directly.  Don't forget you can choose a free product from the Sale-a-Bration promotion for every £45 (before P&P) that you spend on catalogue items until 31 March 2014.

Have a great weekend huddled up and make you sure you stop by Nina's blog as I know she has a fab project to share with you. Click on the next button below to take a look....


Have a fantastic weekend!  A la prochaine! Amitiés!

Nicole

LinkWithin

Related Posts with Thumbnails