Showing posts with label Birthday. Show all posts

Thursday, 26 May 2016

Pinkies Sneak Peak 2016/17 Annual Catalogue Blog Hop


Thank you for joining us on another Pinkies Blog Hop! We're showcasing lots of gorgeous projects using products from the new Stampin' Up!® Annual Catalogue. Simply use the buttons at the end of each post to keep hopping!

Welcome to those who have joined me from Hannah's blog - wasn't her project gorgeous? I just love how she has used the new products from Stampin' Up!'s new annual catalogue which launches on 1 June.

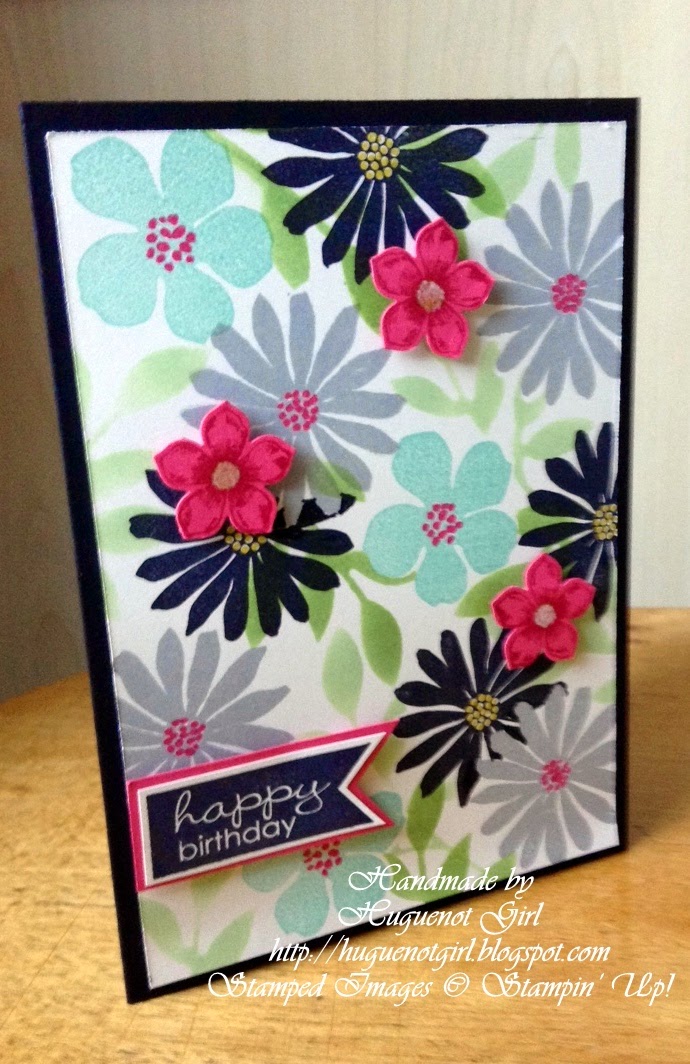
I have a lot of birthdays coming up so needed to make a batch of girlie cards and just had to use one of the new in-colours - Sweet Sugarplum [don't you just love the colour and the name ;-)]. I decided to pair it with one of the new hostess sets - Gift of Love. I also used the new Thoughtful Banners stamp set which co-ordinates with a new punch - the Duet Banner Punch (and you'll be able to get both as a bundle and save 10% - I love a bargain!)


The panel on the side has been made by stamping one of the images from Gorgeous Grunge in Sweet Sugarplum ink onto Sweet Sugarplum cardstock, interspersed with light brushes from the Wink of Stella gold pen. I also created a raised effect by stamping the banner twice, and cutting part of it out and gave it extra dimension by using Stampin' Dimensionals.


I did lots of versions of the flowers, until I was happy with the blended effect, but like all crafters I don't like to waste anything, so used some left over items to make these two cards....


Don't forget to stop by Sarah's blog as I know she has a fab project to share with you. Click on the next button below to take a look....


To make these projects you will need:

Cardstock/Paper: Thick Whisper White, Whisper White, Sweet Sugarplum  Stamps: Gift of Love (Hostess 2016/17), Thoughtful Banners, Gorgeous Grunge  Ink: Sweet Sugarplum, Pear Pizzazz, Momento Black Tuxedo, Blushing Bride,  Tools/Accessories: Duet Banner Punch, Wink of Stella pen (gold)  Stampin' Dimensionals, Blender pen


You can order from my online shop 24/7 or if you prefer contact me directly. Don't forget you can't order any of the sneak peak items though until 1 June 2016. Why not contact me and I’ll send you an advance copy of the new catalogue.

A la prochaine! Amitiés!

Nicole

Friday, 12 September 2014

Fast Friday - Week 21

I needed some birthday cards earlier this week and had none in stock and didn't have much time to make them as they needed to go in the post asap. So what's a girl to do? Go to my recently purchased Stampin Up! goodies and the Hey There Buds stamp set seem to call out to me saying "use me, use me!"

One of the cards was for my cousin and she loves red. So I decided the flowers would be in a mix of reds, but I would colour the stem and leaves in black for a more modern take.


The stamp does come with its own greeting "built in" - Hey There - but as this was a birthday card, I wanted something more suitable so used two of the stamps from the Memorable Moments set.


As you can see I did get a bit of a mottled effect from using the markers to colour in the image (probably because it was the first time I had used the stamp), but I really like the finished effect.

To make this project you will need:

Cardstock/Paper: Whisper White  Stamps: Hey There Buds, Memorable Moments  Ink: Basic Black marker, Real Red marker, Cherry Cobbler marker, Black Stazon  Tools/Accessories: Rhinestones


You can order from my online shop 24/7 or if you prefer contact me directly.

Why not come back next week when I will have some more inspiration for you with another quick project?

A la prochaine! Amitiés!

Nicole

Friday, 20 June 2014

Inspired By ....

No Fast Friday this week, instead today is the start of an occasional series called "Inspired By". I was inspired (pun intended!) by Kristina Werner's recent project when her inspiration was a duvet cover. I thought this was a clever idea and then looked at the skirt I was wearing and thought this would make the good basis for a card. So without further ado here is my card.....


Stampin' Dimensionals and the raised punched Petite Petals are very useful to cover up any less than perfect stamping (what moi?!)


I have used a number of techniques - including creating a stencil from a negative die cut and sponging the resulting image. I also used post-it notes to create masks when layering the stamped flowers over one another.


And here is the pattern from the skirt that inspired it all! What do you think?


To make this project you will need:

Cardstock/Paper: Basic Black, Very Vanilla, Strawberry Slush  Stamps: Secret Garden (retiring), Banner Greetings (Hostess 2013/14 retiring), Petite Petals  Ink: Smoky Slate, Strawberry Slush, Pistachio Pudding, Wild Wasabi, Summer Starfruit marker (retiring), Pool Party, Black Stazon  Tools/Accessories: Secret Garden Framelits (retiring), Petite Petals Punch, Little Leaves Sizzlets (retiring), Stampin' Dimensionals, White Chalk marker


I have used the Secret Garden stamp set and coordinating framelits which are both on the retiring list so grab them whilst you can as some items on the list have already sold out (eg: the Little Leaves sizzlet which I have also used to create a mask to sponge the outline of the leaves on the card). You can order from my online shop 24/7 or if you prefer contact me directly.

I will be back with a Fast Friday card next week.

A la prochaine! Amitiés!

Nicole

Friday, 9 May 2014

Fast Friday - Week 14

This week I once again needed to make the project very quickly as I have been working very late in the day job most of the week so I looked to Pinterest again for inspiration (whatever did we do before  Pinterest?) and also looked at some part-finished projects on my craft table. Et voilà!


Firstly I found a card blank that I had already made with Crumb Cake cardstock with a white circle background. This had been made by using a sponge dauber and "stamping" Craft Whisper White ink in a pattern over the card base - super quick to do. I also had the banner stamped and cut out ready to use. So all I needed was to quickly use my Big Shot to cut out the black leaf using my favourite go-to Sizzlits die and stick this on the card base. The finishing touches were some sequins cut from the Gold Sequin trim ribbon which is in the Spring/Summer catalogue and then I added a swirl of linen tread. And here's the close-up (aka arty photo)!


To make this project you will need:

Cardstock/Paper: Crumb Cake, Basic Black, Whisper White  Stamps: Banner Greetings (Hostess 2013/14)  Ink: Black Stazon, Craft Whisper White  Tools/Accessories: Little Leaves Sizzlits die, Gold Sequin trim, Linen thread, Sponge daubers, Stampin' Dimensionals, Glue dots


You can order from my online shop 24/7 or if you prefer contact me directly.

Today it is bright and sunny (although very windy) here in my part of the UK which is a big improvement from yesterday when it rained all day! I felt very sorry for the Women's Bike Tour which came through our town centre as part of the 2nd stage (appropriately an Italian won the stage as we have a large Italian population in the town). Despite the horrendous rain it was an amazing sight to see as I peered out of the office conference room window! Hope you have a good weekend!

A la prochaine! Amitiés!

Nicole

Friday, 11 April 2014

Fast Friday - Week 11

As you will know from my recent posts I was on a crafty retreat in Birmingham last weekend with some fellow demonstrators. As always when getting together at such event we make swaps so I thought you might like to see my swap. This was the intended swap for everyone:


The idea for the card came from one I cased by Hannelie which I had seen on Pinterest.


Because of the patterned paper inside the card, I stamped one of the images from Four Frames onto a label and then cut this out with the matching Decorative label punch - now there is the perfect space to write a greeting!


As I had not quite finished the swaps before I left for the weekend (yes I know I am so last minute dot com - LOL!), I decided I would finish them off the night before (I was staying with my cousin and her husband). Unfortunately, when I went to finish the swaps I discovered I had left the stamp I needed for the greeting behind! Eek! So what's a girl to do? Improvise! So I used one of the greetings from the Too Kind set instead. These were the resulting swaps:


They came out ok, but I still think I prefer the original - what do you think?

To make these projects you will need:

Cardstock/Paper: Whisper White, Polka Dot Parade DSP  Stamps: Banner Greetings (Hostess 2013/14), Four Frames Too Kind  Ink: Black Stazon, Rich Razzleberry, Marina Mist, Real Red, Old Olive  Tools/Accessories: Bitty Butterfly punch, Circle 2½" punch, Circle 1⅜" punch, Decorative Label punch, Stampin' Dimensionals, Window Sheet, Rhinestones


You can order from my online shop 24/7 or if you prefer contact me directly. Don't forget to check out the weekly deals in April!

A la prochaine! Amitiés!

Nicole

Saturday, 13 July 2013

Pinkies Stampin Up Annual Catalogue Blog Hop


We’re so glad you could join us on our Blog Hop. We’ll be showcasing lots of gorgeous projects using products from the new Stampin’ Up!® Annual Catalogue. Simply use the buttons at the end of each post to keep on hopping. We love comments, so please do tell us what you think!

Welcome to those who have joined me from Nina's blog - wasn't her twisted easel card gorgeous?

My project is focusing on one of the hostess stamp sets – which you can only get if you host a party with sales of a minimum of £150 or more.  There are some fabulous sets this year – I had great trouble choosing which one to show you today.


Recipe
Cardstock/Paper: Pistachio Pudding, Whisper White, Garden Green
Stamps: Morning Meadow (hostess), Tape It
Ink: Smoky Slate, Pistachio Pudding
Tools/Accessories: Big shot, Polka Dot Embossing Folder, Stampin’ Dimensionals, Large pearls

You will see I have created a birthday card using one of the gorgeous new in-colours – pistachio pudding (I just love that name!) and the versatile hostess set Morning Meadow – this has both greetings and images.

The stamp set coordinates with the fabulous new pansy punch – unfortunately I don’t have this yet, so I had to cut all the flowers by hand!  Although it was not difficult to cut out it was a little time consuming, so I think the punch will be going on my next order ....


If you would like to get this exclusive hostess set, why not contact me to book a party?

Have a great weekend enjoying our unusual (for the UK) summery weather and make sure you stop by Jenny's blog as I know she is has a fab project showcasing a different hostess set. Click on the next button below to take a look....


A la prochaine! Amitiés!

Nicole

Sunday, 22 July 2012

More Birthday Butterflies


You may have noticed that a lot of my cards feature butterflies and this one is no exception! This card was actually my swap at Michelle Last's quarterly training last weekend. In fact I actually got the inspiration for this card from my own name badge that I had to make when I attended SU's Regional training in Leamington Spa in May.

Not sure you can see this clearly in the photo but I added SU's gorgeous champagne shimmer mist paint to the swirl stamp from the Everything Eleanor set before I stamped it on the card.

Recipe
Cardstock/Paper: SU Very Vanilla, SU Rich Razzleberry, SU Brushed Gold
Ink: SU Basic Black, SU Rich Razzleberry, SU Champagne Mist Shimmer Paint
Stamps: SU Everything Eleanor, SU Happiest Birthday Wishes (Hostess)
Tools/Accessories: SU Pearls, SU Stampin' Dimensionals, SU Beautiful Wings Embosslits, SU Labels Collection Framelits, SU Vintage Wallpaper Embossing Folder

If you would like to order any of these items and take advantage of SU's current Everyday Enchantment promotion, please contact me and I will be happy to help.

A la prochaine! Amitiés!

Nicole

Saturday, 2 April 2011

New(ish) Stampin' Up Demonstrator - Moi!

After several months pondering about this I finally decided to become a Stampin' Up demonstrator (the offer at the time I joined in the UK was too good to resist - sorry it's expired now)!  I had my first workshop at my house and had 5 guests turn up (good job it wasn't more as I can't fit more than that round my dining/kitchen table - I really ought to action my ideas for an extension!).  Despite being very nervous for the week or so beforehand, it went alright on the night (well that was what I thought anyway)!  I was on a real buzz by the end and had got some orders.  I phoned my Mum to tell her the good news and the ex-teacher in her came out - she told me to write down what had gone well and not so well!!

Unfortunately I don't have any photos of the card we made, but the one below is very similar (apart from the non-SU greeting and non-SU gems).


Recipe
Cardstock/Paper: SU Rich Razzleberry, SU Whisper White, SU Designer Series Paper Patterns Stack (Brights)
Stamps: SU Vintage Vogue, PTI Enjoy the Ride
Ink: SU Old Olive, SU Rich Razzleberry
Tools/Accessories: SU Ornament Punch, SU Stampin Dimensionals, SU Old Olive Satin Ribbon, Self-adhesive purple gems from stash

As you can see the colour combo is Old Olive and Rich Razzleberry (don't you just love that name and the way it trips off the tongue?!)

Enjoy!

A la prochaine! Amitiés.

Nicole

Friday, 25 March 2011

40th Birthday Card

A quick post to showcase a 40th birthday card I have made for a friend.  As I have used embroidery thread (floss) on the card this qualifies for PTI's blog hop for March.


I also made a coordinating bottle tag.

Recipe
Cardstock/Paper: SU Certainly Celery, PTI Sweet Blush
Stamps: SU It's Beautiful jumbo wheel (discontinued), SU Just Believe, PTI Big Birthday Wishes
Ink: SU Old Olive, SU White Craft
Tools/Accessories: Self-adhesive Gems from stash, White floss, SU stampin dimensionals, PTI By the Numbers die collection, White filigree embossing powder

Note: the oval used for the greeting has in fact been created using the leftovers from the By the Numbers die!  Aren't crafters a thrifty bunch!?

Amitiés! A la prochaine!

Nicole

Sunday, 13 February 2011

Birthday Flowers

Just showcasing a recent card and matching gift bag that I made for a friend at work (she has received these so I know it is safe to share them here as she does read my blog).

This is a close up of the card - I used a masking technique with a post-it note for the background flower image.  I have used SU Crumb Cake ink on SU Crumb Cake Cardstock for a tone on tone effect.  I got the idea for the flower from Debbie Olson's blog - she used the die with felt to make a poinsettia brooch (I did try this but my version was a bit naff so went with a paper version and used it as an embellishment)


I made a co-ordinated  mini gift bag as well for the necklace I bought her.  This time I used SU's Old Olive ink for the background flower image as I wanted it to stand out more as I only stamped the image once (which I accented with Stickles Patina - I LOVE STICKLES and own nearly all of the colours).


Recipe
Cardstock/Paper: SU Crumb Cake, SU Very Vanilla, PTI 2009 Bitty Dot Basics Patterned Paper,
Stamps: PTI Text Style II, PTI Backgound Basics: Botanicals, WMS Frame It
Ink: SU Crumb Cake, SU Old Olive, Momento Tuxedo Black
Tools & Accessories: PTI Signature Series Flower Die, PTI Favour It #3 Die, PTI Simply Chartreuse Swiss Dot Satin Ribbon, PTI Vintage Button Ripe Avocado, The Ribbon Girl Button Twine Jute Natural, Stickles Patina, SU Stampin Dimensionals

That's it - a quick post for me (makes a change!)

A la prochaine! Amitiés

Nicole

Thursday, 23 September 2010

Which Version Do You Prefer?

Hi there!  Thought I would get interactive today and wondered if you could let me know which of these three versions of a similar card do you prefer?

I started off with this one (let's call this version 1 - original huh?!):


I really loved the simplicity of this but wondered whether it would be better to add a sentiment, so added this SU modern label and ended up with this revised card (let's call this version 2):


However, wasn't sure I really liked it - think I preferred the original version, but I really wanted to have a sentiment.  So decided to come up with a variation and this is what I ended up with (version 3):


Recipes
Stamps: PTI CHA Set 2010 Four of a Kind, PTI Anniversary Set Round and Round
Cardstock/Paper: PTI Aqua Mist, PTI Hawaiian Shores
Ink: PTI Simply Chartreuse, Versamark
Tools/Accessories: PTI Hawaiian Shores grosgrain ribbon, Stickles patina, SU modern label punch, SU stampin dimensionals, White filigree embossing powder, clear embossing powder

So how did I do the last card?  Well I stamped the large leaf image from the stamp set using PTI Simply Chartreuse ink onto PTI Aqua Mist cardstock.  Then using the single matching leaf image I stamped this (again using the same ink) where the fourth flower should have been.  Next I stamped the 3 flower images with Versamark and then heat embossed them with white Filigree embossing powder, adding Patina Stickles to accent the flower centres.  Using a scrap of PTI Hawaiian Shores cardstock I made a strip of card to cover the join of the stamped leaf images.  Onto this strip I then stamped my greeting in Versamark and heat embossed it with clear embossing powder.  Finally I added the knotted ribbon round the card.  Et voilà!

By the way I know the colours look slightly different on the last version, but they are the same (despite my best efforts to adjust in Picassa) - just shows what a difference it makes when a photo is taken on a different day (despite being taken in the same place about the same time of day and with (seemingly) similar light conditions!).

No doubt those of you who are PTI aficionados will have spotted that I used PTI’s exclusive CHA Four of a Kind stamp set (only available to those who attended CHA in Chicago this July). Unfortunately I was not one of those lucky people (sigh) – but I did manage to acquire this set from someone who had been and had got at least 2 (and probably more!) and was kind enough to share one of her extra sets!

So which version do you prefer?  Let me know in the comments section!  I thought I liked the last version best but now I'm not so sure (whoever came up with the phrase "I used to be indecisive but now I'm not so sure" must have been thinking of me!).

A la prochaine! Amitiés.

Nicole

Thursday, 9 September 2010

Quick card

I suddenly remembered this morning that I needed to send a birthday card today to one of my colleagues.  I didn't have much time as I needed to get to work but I managed to pull this card together card in just 10 minutes (this includes design time) which must be some sort of miracle for me (LOL!) - although it was made up mostly from leftover elements from other projects!


Recipe
Stamps: PTI Anniversary Set Round and Round
Cardstock/Paper: White A6 card blank from stash, PTI Stamper's Select White, PTI Green Boutique
Ink: PTI Hawaiian Shores, PTI Aqua Mist, PTI New Leaf
Tools/Accessories: Self-adhesive gems from stash, SU circle & modern label punches, PTI Mat Stack 3 die, PTI Hawaiian Shores classic grosgrain ribbon, SU Stampin Dimensionals

I started off with a die cut I had made using PTI's mat stack 3 die with one of PTI's Green Boutique paper (by the way I absolutely love this die - I bought the All Booked Up stamp set almost just because of the co-ordinating stamp!).  I had planned to use the die cut with another card but it didn't work (will show what did work in a couple of days!).  I then wanted to use an image I had stamped using PTI's latest anniversary set Round and Round (am just loving this stamp set it is SOOOOO versatile!).  The stamping had gone slightly wrong on the leaves, so I had restamped the leaves part of the image and then cut them out and mounted them with 3D foam to cover up the original mistake and give it more dimension.  Even the ribbon had been left over from another card and you know how us crafters never like to waste anything!  The only "new" bit was the "Birthday Wishes" sentiment punched out using SU's modern label punch which I acquired via a friend of a friend as this punch is not (currently) available in the UK SU catalogue.  And just time for a quick photo (apologies as it is not the best) before I was out the door to work.  Et voilà!

It made me realise that it is very useful to have some elements ready on stand-by to help out when I need to put together a quick card.

As I have used some punches and a die, I thought it qualified for the latest challenge on A Passion for Papertrey - punch it!

Whilst I am not claiming this is the best card I have ever made, I am nevertheless happy with the outcome!  Not bad for 10 minutes!  What do you think?

A la prochaine!  Amitiés!

Nicole

Friday, 13 August 2010

Too Late!

Story of my life!  Suddenly saw the Embellish Birds Colour Challenge - however, I was too late and the deadline had already passed to submit an entry!  Anyway, even though it is too late here is my card!


Recipe

Stamps: Hero Arts Birds n Butterflies, Hero Arts Bird Branch Alphabet, WMS Asian Gardens
Cardstock/Paper: SU Very Vanilla, SU Old Olive, PTI Raspberry Fizz
Ink: Brilliance Pearlescent Chocolate, PTI Vintage Cream
Tools/Accessories: Cuttlebug Circle Frame die, We R Memory Keepers Corner Chomper, SU Old Olive satin ribbon, Stickles Cinnamon

A la prochaine! Amitiés.

Nicole

Friday, 6 August 2010

Tote-ally Cute?!

EDITED TO ADD - MY FAVOURITE PTI CARD FROM 2010

I got the idea for this card layout and design from a card designed by the lovely Dawn McVey and put my own spin on it.  I really loved the colour combo in Kristina Werner's Readers' Choice Colour Inspiration No 3 (which I used in a previous post, although I must admit that this time I haven't used one of the colours - celery) - so combined both to come up with the card below.  I have given this card to my colleague for her birthday tomorrow - hopefully she won't read this post before hand.


A few days after I finished the card I was feeling particularly creative and decided to make a coordinating tote bag for the gift I have given her.


I just LOVE the results and think it is tote-ally cute (LOL!).  When I gave it to Sue yesterday (as she is now on leave) she thought the gift bag was a present in itself!  What do you think?

Recipe
Stamps: Hero Arts Dots & Flowers, PTI Anniversary Set Round & Round, PTI All Booked Up, PTI 2009 Holiday Tags Collection (for "To & From" stamp on reverse of tote gift bag label - which you can't see!) 
Cardstock/Paper: SU Very Vanilla, SU Elegant Eggplant
Ink: Encore Purple, PTI Ripe Avocado, Brilliance Pearlescent Chocolate, Versamark
Tools/Accessories: Lauren Meader's Timeless Template Around Town Tote for PTI, PTI Matt Stack 3 Die, We R Memory Keepers Corner Chomper, We R Memory Keepers Crop-a-Dile, SU circle & scallop punches, SU oval punch, SU Old Olive satin ribbon, SU Stampin Dimensionals, Lilac self-adhesive gems from stash, Lilac Stickles

A la prochaine! Amitiés.

Nicole

Monday, 26 July 2010

Butterfly Birthday Wishes

Apologies for the lack of posts - life just gets in the way sometimes!  Thought I would post a card (as this is what this blog is about) that I made about a month ago (just haven't had time to post it).  I took the basic idea for this card from one I had seen on the Paperlicious blog and put my own spin on it.


Recipe
Stamps: PTI Anniversary Set Round & Round
Cardstock/Paper: SU Whisper White, Basic Grey Wisteria 6x6 pad
Ink: PTI Plum Pudding
Tools/Accessories: We R Memory Keepers Corner Chomper, PTI Plum Pudding satin ribbon, SU circle punch, Martha Stewart butterfly punch, SU Stampin Dimensionals, Purple self-adhesive gems from stash

And this is the arty angle!


A la prochaine!  Amitiés.

Nicole

LinkWithin

Related Posts with Thumbnails