Showing posts with label Punch. Show all posts

Thursday, 26 May 2016

Pinkies Sneak Peak 2016/17 Annual Catalogue Blog Hop


Thank you for joining us on another Pinkies Blog Hop! We're showcasing lots of gorgeous projects using products from the new Stampin' Up!® Annual Catalogue. Simply use the buttons at the end of each post to keep hopping!

Welcome to those who have joined me from Hannah's blog - wasn't her project gorgeous? I just love how she has used the new products from Stampin' Up!'s new annual catalogue which launches on 1 June.

I have a lot of birthdays coming up so needed to make a batch of girlie cards and just had to use one of the new in-colours - Sweet Sugarplum [don't you just love the colour and the name ;-)]. I decided to pair it with one of the new hostess sets - Gift of Love. I also used the new Thoughtful Banners stamp set which co-ordinates with a new punch - the Duet Banner Punch (and you'll be able to get both as a bundle and save 10% - I love a bargain!)


The panel on the side has been made by stamping one of the images from Gorgeous Grunge in Sweet Sugarplum ink onto Sweet Sugarplum cardstock, interspersed with light brushes from the Wink of Stella gold pen. I also created a raised effect by stamping the banner twice, and cutting part of it out and gave it extra dimension by using Stampin' Dimensionals.


I did lots of versions of the flowers, until I was happy with the blended effect, but like all crafters I don't like to waste anything, so used some left over items to make these two cards....


Don't forget to stop by Sarah's blog as I know she has a fab project to share with you. Click on the next button below to take a look....


To make these projects you will need:

Cardstock/Paper: Thick Whisper White, Whisper White, Sweet Sugarplum  Stamps: Gift of Love (Hostess 2016/17), Thoughtful Banners, Gorgeous Grunge  Ink: Sweet Sugarplum, Pear Pizzazz, Momento Black Tuxedo, Blushing Bride,  Tools/Accessories: Duet Banner Punch, Wink of Stella pen (gold)  Stampin' Dimensionals, Blender pen


You can order from my online shop 24/7 or if you prefer contact me directly. Don't forget you can't order any of the sneak peak items though until 1 June 2016. Why not contact me and I’ll send you an advance copy of the new catalogue.

A la prochaine! Amitiés!

Nicole

Tuesday, 29 March 2016

Balloon Card and Glitter Tape Bag - Sale-a-bration 2016 Projects

Sale-a-bration 2016 is coming to a close - you only have until 31 March to get your freebies. So I thought you would like to see some projects from a recent party.

This cute card was our make and take using the Sale-a-bration Party Pants stamp set.


To make this project you will need:

Cardstock/Paper: Whisper White, Pacific Point, Pretty Petails DSP Stack  Stamps: Party Pants (SAB 2016)  Ink: Pacific Point  Tools/Accessories: Balloon Bouquet Punch, Stampin' Dimensionals, White Baker's Twine


This gift was for my hostess and contained some lovely biscuits. The technique with this project was how to colour the Sale-a-bration glitter tape set. The white glitter tape can be coloured either using a dauber or using some ink from one of the ink refills added to water in the spritzer bottle.


And here's a close up of the tag - I used punched out a flower from the coloured glitter tape.


To make this project you will need:

Cardstock/Paper: N/A  Stamps: Endless Thanks  Ink: Bermuda Bay, Rich Razzleberry, Basic Black  Tools/Accessories: Glitter Tape (SAB 2016), Gift bag (from stash), Craft sheet, Spritzer bottle, Note tag punch, Mini flower punch (from trio punch set), Stampin' Dimensionals, Basic rhinestones, Pool Party glitter ribbon, glue dots


You can order from my online shop 24/7 or if you prefer contact me directly. Don't forget you can choose a free product from the Sale-a-Bration promotion for every £45 (before P&P) that you spend on catalogue items until 31 March 2016.

A la prochaine! Amitiés!

Nicole

Tuesday, 4 August 2015

You're a Star!

I needed to make a card for a really special person to say thank you for what they had done for me in recent months, but also I had to be careful it wasn't too girly. So I took my inspiration from the bottle bag which I used for the accompanying gift.


It was a bit fiddly trying to get all the small pieces stuck down but I am pleased with the end result! And the words from the Pictogram Punches set sum up my feelings exactly! I just hope the recipient liked the card (I know he liked the bottle!)

Here's the bottle bag that inspired the card:


To make this project you will need:

Cardstock/Paper: Crumb Cake, Night of Navy, Pool Party, Whisper White, Brushed Gold (retired)  Stamps: Pictogram Punches  Ink: Night of Navy  Tools/Accessories: Confetti Stars Border Punch, Itty Bitty Accents Punch Pack, Stampin Dimensionsals, Tombow glue

I hope you can see that you can take inspiration from anywhere! Remember you can order from my online shop 24/7 or if you prefer contact me directly.

A la prochaine! Amitiés!

Nicole

Wednesday, 24 December 2014

Last Minute Gift Wrapping

Sorry for not posting for a while, but unfortunately life has thrown a curve ball. The quote by John Lennon springs to mind "Life is what happens while you are busy making other plans" - too true!

So because of December's curve ball I have not done much crafting. However this was rectified yesterday as I need to wrap some presents for friends. Time was short so I decorated a couple of bags - I am well known by friends and family for my gift bags! Admittedly this one is quite basic, but I am really pleased with how it has turned out and I am a great believer that less is more.


If you love the stamped image featured on the bag you will need to hurry as the Autumn/Winter catalogue that this stamp is featured in will finish on 5 January 2015. It might be too late for you to use this stamp set for Christmas this year, but you could get it ready for next! The note tag punch though is carrying over into the Spring/Summer Catalogue that comes out on 6 January 2015.

To make this project you will need:

Stamps: Cheerful Christmas  Ink: Cherry Cobbler  Tools/Accessories: Kraft Paper Bag (from craft stash), Cherry Cobbler Seam Binding Ribbon, Note Tag Punch, Cherry Cobbler Baker's Twine


You can order from my online shop 24/7 or if you prefer contact me directly.

I hope my gift bag has inspired you for some quick last minute gift wrapping.

I would like to wish all my readers a lovely Christmas. A la prochaine! Amitiés!

Nicole

Friday, 31 October 2014

Fast Friday - Week 24

Now you might think that the All Is Calm DSP from the Autumn/Winter Seasonal Catalogue is just for Christmas, but in fact most of the designs can be used at any time of the year. And to prove it here's a card I made for a friend's recent birthday. I put this together using some left over items from other projects that I had on my craft desk - the die cut leaf and stamped image.


To make this project you will need:

Cardstock/Paper: All Is Calm DSP, Whisper White, Pear Pizzazz, Soft Sky, Old Olive  Stamps: Hello There (Hostess 2014/15)  Ink: Lost Lagoon  Tools/Accessories: 1⅜" Circle Punch, 1¾" Scallop Circle Punch, Pistachio Pudding Thick Baker's Twine, Party Pennants Bigz L Sizzix die, Stampin' Dimensionals, Basic rhinestones


You can order from my online shop 24/7 or if you prefer contact me directly.

I now have a Facebook page, so why not like this page to be updated on regular offers and details of any classes I am running.

A la prochaine! Amitiés!

Nicole
Friday, 20 June 2014

Inspired By ....

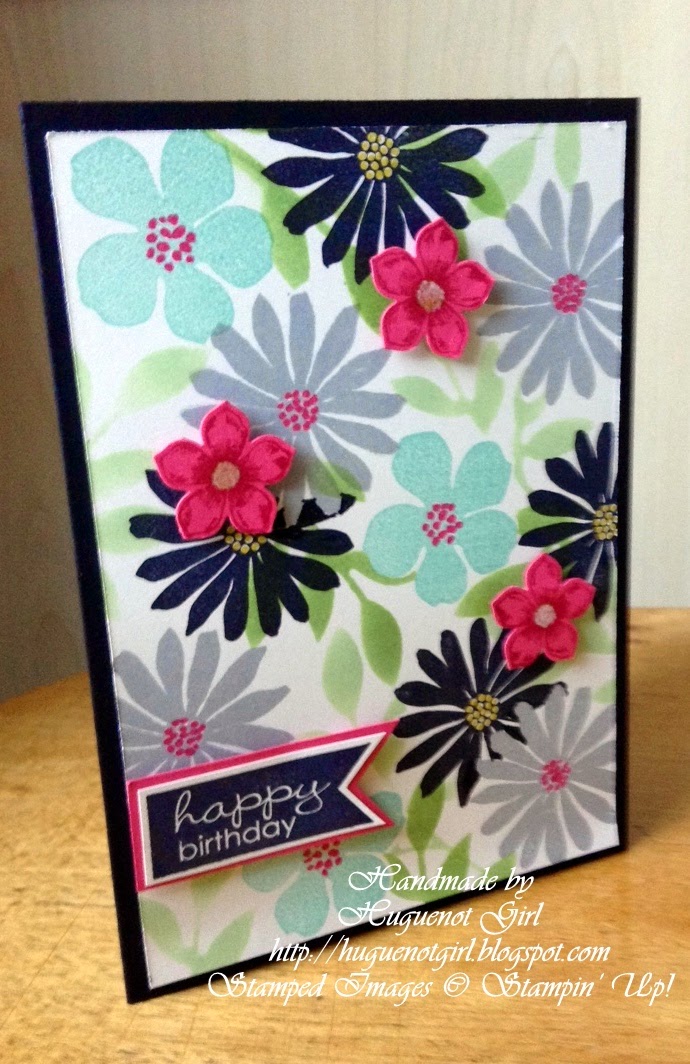
No Fast Friday this week, instead today is the start of an occasional series called "Inspired By". I was inspired (pun intended!) by Kristina Werner's recent project when her inspiration was a duvet cover. I thought this was a clever idea and then looked at the skirt I was wearing and thought this would make the good basis for a card. So without further ado here is my card.....


Stampin' Dimensionals and the raised punched Petite Petals are very useful to cover up any less than perfect stamping (what moi?!)


I have used a number of techniques - including creating a stencil from a negative die cut and sponging the resulting image. I also used post-it notes to create masks when layering the stamped flowers over one another.


And here is the pattern from the skirt that inspired it all! What do you think?


To make this project you will need:

Cardstock/Paper: Basic Black, Very Vanilla, Strawberry Slush  Stamps: Secret Garden (retiring), Banner Greetings (Hostess 2013/14 retiring), Petite Petals  Ink: Smoky Slate, Strawberry Slush, Pistachio Pudding, Wild Wasabi, Summer Starfruit marker (retiring), Pool Party, Black Stazon  Tools/Accessories: Secret Garden Framelits (retiring), Petite Petals Punch, Little Leaves Sizzlets (retiring), Stampin' Dimensionals, White Chalk marker


I have used the Secret Garden stamp set and coordinating framelits which are both on the retiring list so grab them whilst you can as some items on the list have already sold out (eg: the Little Leaves sizzlet which I have also used to create a mask to sponge the outline of the leaves on the card). You can order from my online shop 24/7 or if you prefer contact me directly.

I will be back with a Fast Friday card next week.

A la prochaine! Amitiés!

Nicole

Friday, 30 May 2014

Fast Friday - Week 16

After last week's super quick card from the fabulous Hip Hip Hooray card kit, I am back with a "proper" card.

This was inspired by an idea from Connie Stewart and one of her flash cards. I have stepped it up and changed the colours, but you can still see Connie's basic layout and idea. My version was still within my 10 minute time limit though...


You are probably tired of seeing this colour combo - but I do love it so! I also love the current hostess set Banner Greetings and will really miss this when it retires at the end of June.

The challenge this week over at Less is More is a recipe to use a die cut - and as I have used one of my favourite dies - Little Leaves - this should fit the challenge perfectly!

Edited to add - just discovered the Little Leaves Sizzlets die is on the SU retiring list (sob, sob!!) - and it currently has an 25% discount so grab it while you can!

To make this project you will need:

Cardstock/Paper: Coastal Cabana, Basic Black, Whisper White, Vellum  Stamps: Flower Shop, (Hostess 2013/14)  Ink: Black Stazon, Versamark  Tools/Accessories: Big Shot, Mosaic Embossing Folder, Little Leaves Sizzlets die, Pansy punch, Heat Gun, White embossing powder, Basic pearls, Stampin' Dimensionals


You can order from my online shop 24/7 or if you prefer contact me directly.

A la prochaine! Amitiés!

Nicole

Friday, 25 April 2014

Fast Friday - Week 12

Sorry there was no Fast Friday last week but I am back this week with a quick card that I made to accompany an order for a customer who had ordered the two heart punches. I thought I would show her a way of using the punches - don't worry I used my own punches not hers!


I used some retired DSP called First Edition. But don't worry if you don't have this as it is now available as a Digital Download for MDS - so you can print it out onto your own paper, resize it and even change the colours! How great is that? I punched out 3 hearts from the DSP and then folded them and stuck them back to back to create this fan effect.


To make this project you will need:

Cardstock/Paper: Crumb Cake, Silver Foil, Naturals White, First Edition DSP (retired - alternative First Edition DSP MDS Digital Download)  Stamps: Positively Chevron, Express Yourself (hostess 2013/14)  Ink: Craft Whisper White, Basic Grey  Tools/Accessories: Full Heart punch, Small Heart punch, Modern Label punch, Stampin' Dimensionals, Basic pearls


You can order from my online shop 24/7 or if you prefer contact me directly. Don't forget the Weekly Deals will finish on Tuesday at 10.59pm (BST)!

A la prochaine! Amitiés!

Nicole

Sunday, 20 April 2014

Easter Bunnies Everywhere!

Happy Easter! We are having a big family get together and will be exchanging gifts later today. Do you want to see what I have made? Firstly, I have decorated the plain brown lunch bags with gifts for my Mum and my aunt.


And using some scallop circle punches and some dimensionals I put a little "fluffy" tail on to the back of the bag.


The rest of the family had some bunny ear bags that were a combination of two different projects by some fellow demonstrators (the bunny ear bags by Vicky and the Easter bunny box by Michelle).

And look how quickly they multiplied - LOL!


To make these projects you will need:

Cardstock/Paper: Crumb Cake, Whisper White, Blushing Bride, Basic Black, Basic Grey  Ink: Craft Whisper White, Basic Black marker  Stamps: Positively Chevron, Polka dot (stamp set from stash - non-SU)  Tools/Accessories: Plain brown lunch bag (from local discount store), Tag a Bag Gift Bag, Owl builder punch, Scallop Circle ⅞” punch, Scallop Circle 1¼” punch, Scallop Tag Topper punch, Small Heart punch, Large Oval punch, Extra Large Oval Punch, Linen thread, Blushing Bride Chevron Ribbon, Stampin' Dimensionals


You can order from my online shop 24/7 or if you prefer contact me directly.

Hope you have a lovely Easter!

A la prochaine! Amitiés!

Nicole

Friday, 11 April 2014

Fast Friday - Week 11

As you will know from my recent posts I was on a crafty retreat in Birmingham last weekend with some fellow demonstrators. As always when getting together at such event we make swaps so I thought you might like to see my swap. This was the intended swap for everyone:


The idea for the card came from one I cased by Hannelie which I had seen on Pinterest.


Because of the patterned paper inside the card, I stamped one of the images from Four Frames onto a label and then cut this out with the matching Decorative label punch - now there is the perfect space to write a greeting!


As I had not quite finished the swaps before I left for the weekend (yes I know I am so last minute dot com - LOL!), I decided I would finish them off the night before (I was staying with my cousin and her husband). Unfortunately, when I went to finish the swaps I discovered I had left the stamp I needed for the greeting behind! Eek! So what's a girl to do? Improvise! So I used one of the greetings from the Too Kind set instead. These were the resulting swaps:


They came out ok, but I still think I prefer the original - what do you think?

To make these projects you will need:

Cardstock/Paper: Whisper White, Polka Dot Parade DSP  Stamps: Banner Greetings (Hostess 2013/14), Four Frames Too Kind  Ink: Black Stazon, Rich Razzleberry, Marina Mist, Real Red, Old Olive  Tools/Accessories: Bitty Butterfly punch, Circle 2½" punch, Circle 1⅜" punch, Decorative Label punch, Stampin' Dimensionals, Window Sheet, Rhinestones


You can order from my online shop 24/7 or if you prefer contact me directly. Don't forget to check out the weekly deals in April!

A la prochaine! Amitiés!

Nicole

Friday, 14 March 2014

Fast Friday - Week 7

This week I have something different to share with you - a cute little notebook that only took a few minutes to decorate. I have used my favourite paper from this year's SAB selection - just love the colourway of pool party with black as it is so modern and fresh. (Although I think you might have guessed this already as I have shown a few other projects in this colourway - LOL!)


I even decided to stamp inside the notebook:


And this is what the notebook looked like before I altered it. I got it from a store called Tiger when I was visiting Riga (Lativa) last September. Before you think that is a long way to go to buy a notebook I should point out that Tiger is in fact a Scandinavian company and they have a number of stores throughout Europe including the UK!


To make this project you will need:

Cardstock/Paper: Pool Party, SAB Sweet Sorbet  Stamps: Papillion Pot Pourri  Ink: Black Stazon  Tools/Accessories: Dotted Scallop Ribbon border punch, SAB Banner Punch, SAB Sweet Sorbet Accessory pack, Basic pearls


You can order from my online shop 24/7 or if you prefer contact me directly. Don't forget you can choose a free product from the Sale-a-Bration promotion for every £45 (before P&P) that you spend on catalogue items until 31 March 2014.

A la prochaine! Amitiés!

Nicole

Friday, 7 February 2014

Fast Friday - Week 2

Yay - I've kept it up (ok it's only week 2)! I'm returning once again with a project that you can make in under 10 minutes. The design for the card was inspired by one I saw on France Martin's blog.


To make this project you will need:

Cardstock/Paper: Basic Black, Pool Party, SAB Sweet Sorbet DSP  Stamps: SAB See Ya Later, Memorable Moments  Ink: Black Stazon  Tools/Accessories: Basic pearls, Stampin' Dimensionals, Elegant Butterfly punch, Bitty Butterfly punch, 2½ Circle punch


You can order from my online shop 24/7 or if you prefer contact me directly. Don't forget you can choose a free product from the Sale-a-Bration promotion for every £45 (before P&P) that you spend on catalogue items until 31 March 2014.


Why not come back tomorrow to see how I have totally transformed this plain white bag into something special?

A la prochaine! Amitiés!

Nicole

Thursday, 15 November 2012

Stampin' Up! European Convention 2012...

I can't believe that 2 weeks ago today I had just arrived in beautiful Mainz by the River Rhine to take part in my 2nd Stampin' Up! convention (although it is the 4th European convention). I had a fabulous time with my fellow demonstrators from the Pink Ladies (& Lads!) and also got to meet other amazing SU demonstrators from across Europe.

As SU demonstrators it goes without saying that we love to craft, so whenever we get together we make swaps. These can be in the form of 3-D projects or card fronts, so if we make 10 we get 10 different swaps back using all current product. We can then share these with our customers and fellow demonstrators.  Here are the swaps I did for my fellow Pinkies:


You might think there was not any SU product used for these bracelets but you'd be wrong as the oblong beads are actually made out of SU's gorgeous Floral District DSP - yes really! So how did I make these paper beads you ask? They are actually quite simple. I cut some of the sheets of DSP into long thin triangles (6" by 3/4"). Then using a cocktail stick I rolled the triangle onto itself, fixing it in place with glue (taking particular care with the tip). Each bead was then sealed using clear nail varnish. The bracelet was then made by threading the dried paper beads onto elastic thread and accenting with some beads from my stash. Hopefully you can get the idea from these photos!


Of course I had to package the bracelets up so I made these sweet little co-ordinating boxes using the Big Shot and the Candy Wrapper Bigz L die.


I made a total of 20 of the bracelets for the Pink Ladies whilst the Lads got some keyrings (unfortunately I don't have any photos of these).

Recipe
Cardstock/Paper: Floral District DSP, Rich Razzleberry, Lucky Limeade
Tools/Accessories: Candy Wrapper Bigz L die, Elegant Bouquet Embossing Folder, Elegant Butterfly Punch, Pearls, Stampin Dimensionals, Clear Nail Varnish, Elastic Thread, Assortment of beads from stash

Please come back soon when I will share more about Convention and how you could join me there next year!

A la prochaine! Amitiés!

Nicole

LinkWithin

Related Posts with Thumbnails